Showing posts with label Seasonal Decorations. Show all posts

Monday, April 11, 2011

Happy Spring...

I love spring!  It's so refreshing to see the little bits of green coming up in the garden and to feel the days getting warmer.  In honor of the season, I have made a few blog buttons to share...


To use, simply right click and save the image.
All these buttons were made using, Adori Graphics, I Heart Spring, digi-scrap kit check out her site for tons of digital scrapbooking kits and ideas.

Monday, March 21, 2011

Time for Spring...

I love living in a part of the country that has 4 full seasons, but I will admit that Spring is my favorite.  I love watching everything turn green, seeing the days getting longer and having more sunshine.  I also love what spring brings...namely soccer...lots of soccer. 

Saturday morning I woke up, ready for my oldest son's first outdoor soccer game of the season.  It was snowing...great big fluffy flakes of snow.  The kind of snow that makes you giddy in November, anticipating a long cozy winter.  Not the kind of snow you want to see four hours before a soccer game.  By the time we were at the field, it was merely a colossal mud pit...the snow had melted.  I was left needing a little touch of spring in my house...

 I got this metal flower a couple of weeks ago at JoAnne Fabrics, but I wasn't sure what I wanted to do with it...
I decided to cover a block with some spring-colored paper using mod podge...
I also added a bit of distressing ink around the edges of the paper once the glue was dry...
I drilled a hole in the top of the block...
...and cut a bit of the stem off the flower {actually Kyle cut the stem...it was really hard to cut!}
I used my favorite Silhouette and navy vinyl to add some letters and now I have a little reminder that it will soon be spring...for real!


Thursday, March 17, 2011

Happy St. Patrick's Day...

I put together these fun treat boxes for my boys...and husband...to find this morning.  I used the print & cut option on my Silhouette and I wish the lettering had printed out darker.  This is my first time using that technique, and it took me so long to figure everything out I didn't have time to reprint the tags.  Up close you can see that it says, "Love, the Leprechauns".

I hope that you have fun being Irish for the day!

Tuesday, March 15, 2011

Happy Birthday...

We don't have an imminent birthday...our next family birthday is in about four weeks...but I have wanted a Birthday plate for a while.  I think it would be fun to have a special plate for to use on our birthdays.  I've also been wanting to try glass etching, so I decided to combine the two...
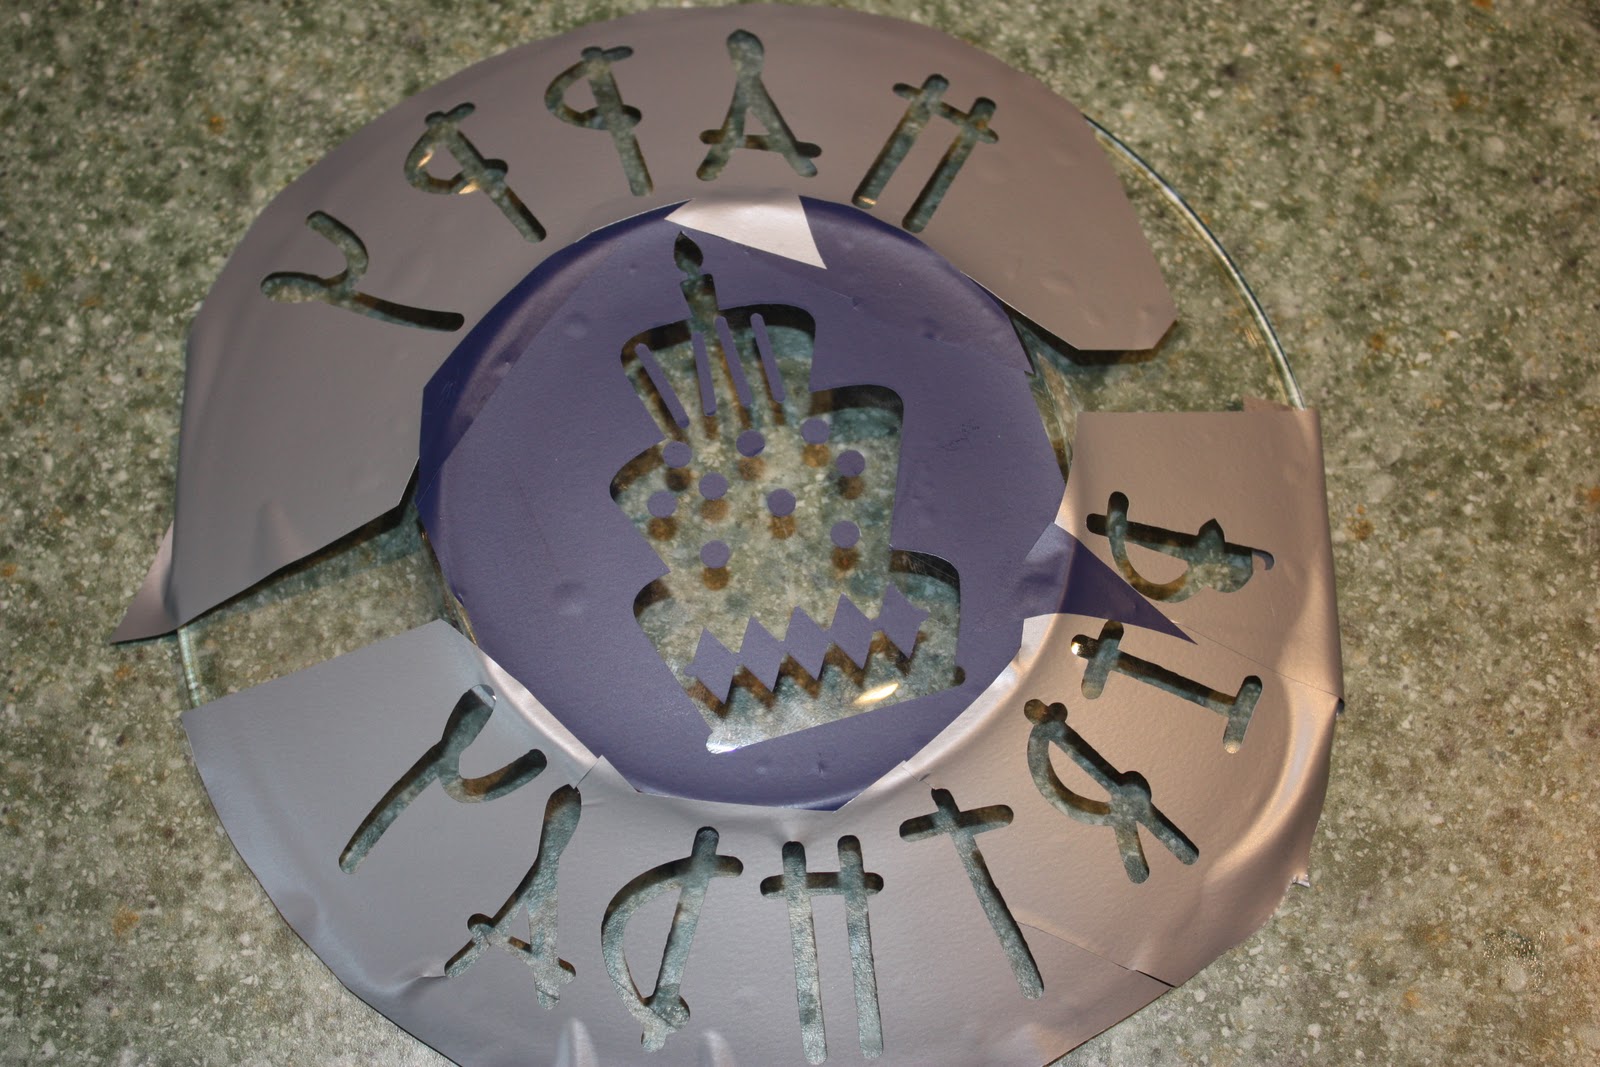
I started with a plain glass plate that I bought at Hobby Lobby.  Using my Silhouette, I cut a Birthday cake shape for the bottom of the plate.
I also cut out the words "Happy Birthday".  This is the second vinyl cut...I was so busy making sure I had the arch of the words correct, that I forgot I needed the mirror image. 
Once I had all the vinyl applied and I made sure there wasn't any glass exposed, I put on the glass etch...
I tried to get the material evenly distributed across the vinyl.  As it turns out, I should have used a thicker coat and worked a bit harder to make sure it was evenly distributed.
It's a little hard to see, but here's our Birthday plate.  I am really happy with the design, and for my first time using the glass etch, I think it turned out pretty well.  I can say that my boys are really excited to use the plate on their birthdays.  My son and I share the next Birthday, I wonder who's going to get to use it first!

How do you make birthdays special in your house?

Tuesday, February 8, 2011

More Valentine Craftiness...

You know by now that I love Valentine's Day!
I was excited to make some personalized Valentines for friends...and I wanted to get my Silhouette in on the fun...
I started with a stack of bright red buckets, found at Hobby Lobby...

Then I had some fun with Silhouette.  I played with fonts and embellishments, trying to get the perfect look for each friend...
Once the vinyl was on the bucket, I added some yummy treats and a couple of ribbons to the handles.  These will be lots of fun to give away next Monday!


What are some of your favorite Valentine treats?

Tuesday, February 1, 2011

Valentine's...

I really love Valentine's Day!  Usually by mid-February I'm tired of the dreary winter days and Valentine's is a great pick-me-up.  As it's the first of the month, it's time to put out the Valentine decorations and time for a new craft.
I started with unfinished wood hearts that I got at Hobby Lobby and painted them with shades of red and pink.  I actually only used red and cream paint and marbled the two together as I painted.
Next, I drilled a couple of holes in the top of each heart.
And I visited my new love, my Silhouette, for some fun Valentine quotes and pictures.
Add a little ribbon or wire through the holes and I have a quick and cute decoration.  
This little shelf, in my dining room, gets a new look every month!  Today was also the day I put my LOVE blocks on the shelf too.  Since I didn't use all the little hearts I made, I have a couple of sweet gifts to give, and they're all ready to go!


What's new for your Valentine decor?

Monday, January 24, 2011

Love & Luck...

I have been having so much fun with Valentine's Day crafting...and other fun things!  You'll see lots of them over the next couple of weeks.  This is one of my new favorites...

I started with four blocks, 4" tall.  I started with an 8 foot post and cut them to size with my chop saw.  The great thing about that is then you have blocks to make a Count Down or what ever other project you can dream up.

I lightly sanded my blocks and then went to the stash of scrap book paper.  I cut 4 Valentine-themed papers and 4 St. Patrick's-themed papers.  I cut them about 1/4" inch smaller than the face of the block.


I also used my rounded corner punch on all the paper corners, for a more finished feeling.

Time for the trusty mod-podge.  If you're struggling with making your mod-podge turn out great, check out this video from the girls at How Does She!

Once the pink hearts were dry, I turn the blocks over and applied the green shamrocks in exactly the same way.

Then I went to my lovely Silhouette to cut some vinyl.  I only took one picture, but I cut out "LOVE" in one font and "LUCK" in another...


I love them...and I love a decoration that can stay out for two months!

Monday, January 10, 2011

Snow-y Craft...

I love to decorate seasonally.  I try not to over do it, but it's fun to have a few things that change out each month to mark the seasons or holidays.  This month I have a new decoration to share...
I made the "Snow" sign with some great wood pieces and a little mod-podge.


I started with wooded letters, a wooden plaque, some craft paper and mod-podge.

Since I knew I was going to mod-podge paper on the front of the letters and the plaque, I started by painting the edges with acrylic paint...white on the letters, blue on the background plaque.

Next I painted the heart red and while the paint was still wet...
I sprinkled on some glitter and brushed off the excess.


I traced around each letter (upside down, on the wrong side of the paper).  I had initially tried mod-podging the paper on first and tearing the excess off to form the shape of the letter.  I decided I wanted a cleaner looking finish, so I traced and cut out all the letters before I applied them to the wooden cutouts.


I mod-podged paper onto the back ground also...this paper I did tear around the edges to get the shape of the wooden background.


And here's the finished project...I really like how it looks up on my little shelf with the Robot Snowmen. Check out how we made those at The Science Mommy


Thursday, December 9, 2010

Holiday Home Tour...

I am joining the Holiday Home Tour, sponsored by LeeLou Blogs.  Pop on over to check out everyone's beautiful holiday decorating ideas...

Leelou Blogs

These are a few of my favorite Christmas decorations...


I collect snow men and enjoy leaving many of them out through February...a couple of lucky ones get to be out year round!

The wooden tree on the left was given to me by my Aunt Jo when I was a freshman in college.  Each month in a care package she would send a new set of ornaments.  {The snowmen will go on in January}

I made this table runner a couple of years ago...I love the look of wool applique.  I have one with turkeys in progress.

Snowmen just make me smile :)


We don't have a fireplace so we reclaim shelves, that have pictures on them during the rest of the year, to serve as a mantle.  I made Kyle and I stockings for our first Christmas together and then the boys for their first Christmases.  Fortunately, Santa fills all the stockings!  My mother-in-law solved the problem of a chimney when my oldest son was about 3, and quite worried about Santa's entrance.  You'll notice a key hanging with Aiden's stocking.  It's a Santa key and the boys hang it on the outside door knob on Christmas Eve...allowing Santa access sans chimney. 


I keep a small scrapbook with all the boys Santa pictures and display the current year's picture in the frame.  {It's still last year's photo...Santa pictures are Saturday!}

We don't have a themed tree...I have several different collections of ornaments and I look forward to putting them out every year.

One of my favorite sets of ornaments are framed pictures of the boys each year...sometimes with Santa and sometimes other candid winter shots.  I'll tell you more about this picture next week...stay tuned!

This is from a collection of bells that have been handed down...the story is that my Great-grandfather brought them with him when he emigrated from Sweden.

The boys have their own tree in our family room...

...their ornaments are mostly toys & candy....it's so much fun!

Thanks for sharing my Holiday Home!